Monday, May 1, 2017

Vincent Price's Stuffed Frankfurters

Vincent Price at a ballgame handing his wife some frankfurters
As I said in the podcast You're the Wurst!!! my favorite cookbook is Mary and Vincent Price's A Treasury of Great Recipes. It's a fantastic collection of recipes from long forgotten restaurants around the world along with a few family recipes from the man himself (along with his wife Mary).

The pictures are great, most of the recipes are gorgeously classic and a few of the recipes are super quaint and of-their-time.

This is one of those recipes........ Well it was up until  few years ago.

This recipe would have been considered overkill or novelty with the way it's made, but in the last few years ridiculous recipes have become de rigueur for food sites to get clicks and eyeballs on their sites.

While it is a bit antiquated in the way it is written (I have adjusted the recipe to be easily followed), it could definitely be a featured recipe in a BuzzFeed video. It has everything today's crazy cooks want: meat, cheese, butter and bacon. You can't lose!

I love hot dogs and eat them often but I've yet to make this recipe. I will damn sure make this in the next few weeks though. The more time I've spent with this recipe the more it calls to me like a siren song that can't be denied after fighting a fruitless fight. Oh well, there are worse things in the world than eating a cheese filled, bacon wrapped hot dog right?

Let's ghoul this! (see what I did there?)

Mary and Vincent Price's Stuffed Frankfurters

4 Frankfurters (hot dogs)
1 tablespoon butter
2 medium onions
2 slices of sharp cheddar cheese- Let's call it enough cheese to fill 4 hot dogs
4 Strips of bacon
4 hot dog rolls
mustard

Special equipment:
toothpicks

• Saute the onions in the butter in a pan over medium heat until the onions are soft and light brown.

• Cut a lengthwise slit into the hot dogs

• Fill the hot dogs with the cooked onions

•Top the onions with enough cheese to cover the length of the dog.

•Wind one slice of bacon around the stuffed hot dog in a spiral until the dog is covered. Secure the bacon in place with toothpicks.

• Place under a boiler and cook until the cheese is melted and the bacon has browned. Alternately, you can cook in a pan until crisp.

• Place the dogs onto a bun and top with mustard (the only condiment you should use).

Enjoy!


You can double this recipe perfectly for a whole pack of hot dogs (not the buns though), but I wanted to present the recipe as it was written.

If you make this, please post a pic for us on our Facebook page. You can also reach us on our Instagram page or Twitter page.

Thanks for reading and listening.

Cheers,
John


You Butter WERK!!!

©2017 John Houser III
On the You Butter WERK!!! episode of the podcast we covered butter. The recipe I  said I would put  up here is as simple as I described it. There's not way you can do it wrong. i mean, you could royally fuck it up by not following the recipe in the way it written (read and re-read the recipe before attempting).

That said......

This recipe is more of a guideline. You can switch out different herbs for each other. Make sure to use the basic proportions (i.e. butter to herb ratio) and you'll be fine.

The tricky part of this whole business is pushing it into a log (I will refrain from a poop joke here). it may seem complicated but after you do it once or twice you'll never have to sweat it again. Just make sure to use parchment paper. It's a little more forgiving than plastic wrap for beginners and you have all of that parchment sitting around doing nothing anyway. You do have parchment paper right?

Let's mix this up.

Rouxde Cooking School Herb Compound Butter

1 pound butter-  room temperature
1 tablespoon chives
1 tablespoon rosemary
1 tablespoon thyme
1 tablespoon sage
1 clove garlic- chopped and mashed into a paste
1/2 teaspoon salt
1/4 teaspoon freshly ground pepper

Special equipment
Parchment paper- 16 inches to be safe
metal sheet pan

In a large bowl, mix all ingredients until incorporated and homogeneous. Scrape all of the herb butter onto the middle of the parchment. Fold the parchment over the top of the butter and then while holding the bottom half of the parchment, use the edge of the sheet pan to push the butter that's under the parchment into a log shape (see the video below). Roll the log completely up in the parchment and twist the ends so it looks like you have a giant Cheech and Chong joint.


Place the butter joint into the fridge for at least an hour to help firm everything up and melt the flavors.

To use, just slice off coins to the thickness you desire and make whatever you're topping instantly more delicious.

Enjoy!


Sunday, March 26, 2017

Sweet Child O' Brine II

This week on the Rouxde Cooking School Podcast we talked about salt. It's the most important ingredient in the kitchen as far as I'm concerned and it's transformative properties make it easy to see why it was used for centuries by apothecaries, witches and warlocks as a main ingredient in their wares.

We have covered brine before but this one is different.

Yes, there is more than one recipe for brine. They can go from fairly complicated (like the holiday brine to very simple (this one).

This recipe will be considerably less complicated and as basic as you can get. It will also change your life. Yeah....... I said it!

This basic brine will make you the Acme of your friends meat cooking masters.

While this brine will make it easier to put color on whatever chop or thigh you are cooking, be sure to constantly flip your food. The sugar in the brine mix makes it easy to burn  the food. Be careful and flip the meat as much as you can. Flipping the meat more than you think helps to keep the meat from

Like I said this is a basic brine. If you want to get more complicated, you can add things like  sage, thyme, rosemary, onions, celery, cinnamon, bay leaf and other spices, fruits or vegetables to steer your meat into the flavor profile you need to match your recipe.

Ready for a crazy simple recipe? Let's do it dear reader!!!

Rouxde Cooking School Simple Brine

1 gallon water
1 cup kosher salt
1/2 cup sugar

In an extra large container to hold a gallon of fluid, place ingredients together in the bowl and whisk or stir until items dissolved together into a clear liquid.

Done.

Yup, that's it. Dead simple right?

you're now ready to use it for chicken, pork or vegetables (yes veggies, it's basic pickling).

Cheers!

Thursday, March 23, 2017

Crosby's Bird's Nest Breakfast

John Houser III
This week on the Rouxde Cooking School Podcast we took a crack at eggs (see what I did there?) and I talked about how I make a dish for my son Crosby called a "Birds nest". I also said I would post the recipe. Well dear reader, here we are.

The podcast episode link can be found here: Liquid Chicken
I came up with this idea (I'm sure I'm not the first) when Crosby was first starting to eat real solid food (not cereal mush) and thought this was a cute idea.

It kept him interested with the novelty of the food, and it also kept me interested with making something fun instead of a making a bowl of Cheerios.

It turned out to be a household favorite that Cros, my wife and I all love to eat. It's basically a more involved version of soft boiled egg and soldiers, a special comfort breakfast my mom made a few times for me when I was young. I loved it every time.

I use whole wheat multi-grain bread because my wife cares about how my kid eats. If it were up to me it would be whatever good crusty bread we had on hand. You can use whatever you want. Yes...... plain ass white bread is fine but lets work on getting you off that shit later.

I usually cut the bread to look like the picture about but I have cut them super thing to really look like a nest. It's up to how playful you want to be. The above pic was literally one of Crosby's breakfasts and we were in "get ready for school mode".

As for the butter in this dish, try to use the good European stuff. There aren't many ingredients in this recipe and it makes a difference. If you don't have the good stuff don't hang yourself, just use regular butter (I do most of the time).

Luckily, this recipe is super easy to make. The problem though is the peeling.......

I fucking hate peeling eggs. Especially soft boiled eggs.

I had a shit time peeling the eggs for the photo above (which is why it's broken). The problem was I forgot a trick I learned about egg peeling.

If you add a teaspoon of baking powder to the pot before you cook the eggs it changes the pH of the water and somehow affects the peelability of the egg. It works better than not doing it at all.

So my friends, let's do this!

Crosby's Bird's Nest

1 slice of bread
1 soft boiled egg *see below for cooking instructions
butter- get the good stuff for your first time
Maldon salt- if you don't have this use kosher or table salt
freshly ground pepper- it makes a big difference

• Heat your soft boiled egg up by pouring the hottest tap hot water you have into a big container (I use a plastic quart Chinese take out container) and place the egg into it. Let it sit in the water until you are ready to assemble.

• place your bread into a toaster or toaster oven. Toast until your preference. I prefer mine a little blackened in spots, but for Crosby I toast it until it gets a bare brown on it so it is a bit easier to eat for a child.

• Once your toast is done, spread butter over it to your enjoyment and then cut it into strips long way and then into thirds cross-way to make your branches. Place onto a plate in a circular pattern.

•Peel your egg. Place on top of the bread branches and then top the egg with Maldon salt and pepper.

• For a kid- Let them break the egg open and then chop the egg up and mix thoroughly so egg and bread and with each other. serve to a happy child.

• For an adult- Cut your own shit up and eat it before it gets cold fool!!!

Enjoy!

* For soft boiled eggs:

6 eggs (or more if you want)
a pot to hold six or more eggs
1 teaspoon baking soda
water

• Set a timer for 5 minutes and 20 seconds

• Place enough water to cover eggs by at least an inch into a pot big enough to hold at least six eggs

• Drop a teaspoon of baking soda into the water

• Bring the pot of water to a vigorous boil

• Add the eggs

• Boil for 5 minutes and 20 seconds

• Transfer to a bowl of ice water

• After five minutes, dry the eggs off and refrigerated until needed

Friday, March 17, 2017

Rouxde Onion Soup

Last week's episode of The Rouxde Cooking School Podcast, Knife to Know You, saw us covering knives. It was a fun time and I said that I would put up a recipe that would get people to practice their knife skills.

Well, here it is.

It took a little time because I wanted to make sure I had the recipe dialed in to where I was happy with it but I have successfully tested it on humans and they liked it (providing they weren't lying of course).

Baltimore got a few inches of snow and ice the other day and we all had the day off. After a few hours of hanging out on a hill sledding with the kids I invited a bunch of friends over to the house to test out the soup.

This recipe easily fed six adults and four children with enough left over for seconds a few times over.

So lets get to it.

Rouxde Cooking School Onion Soup

4 red onions- thinly sliced
4 white onions- thinly sliced
2 yellow onions- thinly sliced
1/4 cup canola oil plus extra for rubbing on the bagutte
1 baguette- sliced into 1 inch thick rounds
 12 cups of chicken stock
2 tablespoons chicken base (optional, but worth it- I use better than broth)
2 tablespoons shiro miso (optional but makes a big difference)
3 bay leaves
2 tablespoons fresh chopped thyme
1 cup apple cider
1 pound cheddar (mild melts better)- shredded
3 tablespoons kosher salt
1/4 teaspoon fresh finely ground black pepper

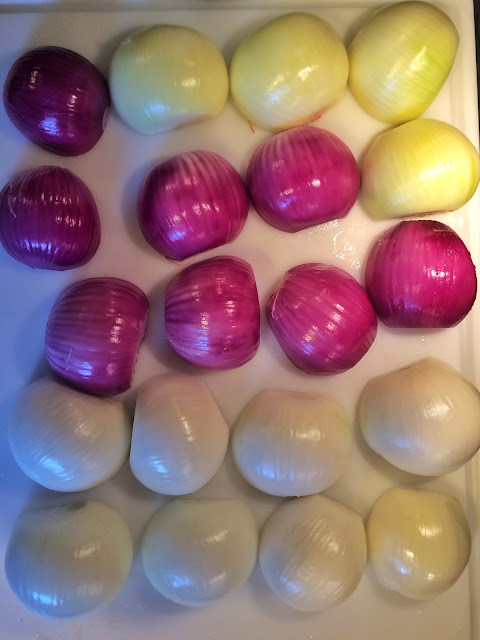
Halved Onions
©2017 John Houser III
 • Heat your oven to °375F.

• Rub both sides of your baguette slices with canola oil. Put them onto a sheet pan and bake in the oven until golden brown.
©2017 John Houser III
• In the largest pot you have over high heat, add the 1/4 cup of canola oil and heat until smoking. Add the onions and cover. Let cook for five minutes and then begin stirring them. Be sure to keep the heat high and to stir them every few minutes to keep from burning. DO NOT ADD SALT!! cooking onions for 45-60 minutes to develop a good brown color. You don't want them darkly caramelized, but a nice medium brown is good.

• While the onions cook, bring the stock, chicken base, miso, bay leaves, thyme and salt & pepper to a simmer over high heat. Turn the heat to low and keep hot.

• When the onions are looking brown and a little dry, deglaze the pot with the apple cider. Add the stock and simmer the soup for another fifteen minutes.

• Turn the oven onto the broiler setting

• Ladle soup into an oven-proof crock. Top with a couple baguette slices and then the cheese. Place under the broiler until the cheese is melted, bubbly and if you're like me, a little burnt.

• Enjoy!!!!
©2017 Leana Houser


Friday, March 3, 2017

Taters GonnaTate


©2017 John Houser III
So episode three is out. You can find it here:

Soundcloud:

https://soundcloud.com/user-593410316/taters-gonna-tate

It's a super funny episode (if I may be modest), but it's also very informative and entertaining as well. 

We covered potatoes this week and talked about their history as well as the reason potatoes became popular across Europe and then the USA. 

We hope you like it. If you listen to it, I can't see how you won't. I'm that funny (Bex is terrible as usual). 

At the end of the episode, I talked about the recipe I was going to make and that's why we're here. To learn how to make the following:


Hasselback Potatoes Au Gratin

3 oz Parmesan cheese- finely shredded
5 oz cheddar- finely shredded
1 tablespoons thyme- finely chopped
6 sage leaves- finely chopped
2 large cloves of garlic- finely microplaned or finely chopped and mashed into a paste
2 teaspoon kosher salt
1/8 teaspoon pepper
1/8 teaspoon fresh nutmeg- finely grated
2 tablespoons Dijon mustard
2 tablespoons miso paste
2 cups (1 pint) heavy cream
3.5 pounds of Russet Potatoes- sliced thinly (1/8 inch thick) on a mandolin or by hand (you're a beast if you do it this way)


• Preheat an oven to 400° F

• Mix the first eleven ingredients in a large bowl until combined.

•Fold in the potatoes and using your hands, make sure every slice is covered with the cream sauce

• Place the potatoes up in an oven-proof pan like dominoes. Regrdless of shape, make sure they are all up and not flat

• Cover with aluminum foil and bake for 45 minutes

• Uncover and bake for another 30 minutes

• If it is not crispy or brown enough, finish under the broiler until your desired crispness/ color


• Let it cool for at least 10 minutes before serving

• Enjoy!!


©2017 John Houser III


If you have questions, please feel free to ask me through here or at john@rouxde.com or at rouxdecookingschool@gmail.com

Cheers!!

Friday, February 24, 2017

Say Cheeeeeese............Sauce

I love cheese sauce. It's terribly versatile stuff. I use it mixed with various shapes of pasta for mac and cheese, drizzled over nachos, mixed with canned chilies for queso and sometimes I pour it over French fries in an elegant baptism of velvety bliss.

Now, you can too!!

In our latest episode of the Rouxde Cooking School Podcast we covered the recipe dearest to my heart: Roux.

Roux helps to make myriad deliciously thickened sauces and soups but the one we're gonna concentrate on today is my cheese sauce.

Let's get started shall we dear reader??

First, if you didn't take notes during the podcast (and why the hell weren't you?) here is a link to a piece I wrote previously about roux complete with a recipe:

http://rouxde.blogspot.com/2009/11/well-its-about-damn-time_10.html


There, now that you know how to make a roux, lets get started on making this silky cheese sauce. Now be aware before making this. It is a little thinner than most cheese sauces. Why? Because that's how I like my cheese sauce that's why. I find it easier to work with and much better on pasta then the thick goopy shit you get from other recipes. If you try it and don't like the consistency but enjoy the flavor then just add a little more roux to the sauce to thicken to your monstrous desires.


Rouxde Cooking School Cheese Sauce

1 tablespoon olive oil
1 medium onion- medium dice
1 tablespoon salt1/8 teaspoon (20 turns of a pepper mill) black pepper
4 cloves garlic- sliced
64 ounces (1/2 gallon) whole milk
8 ounces (1 cup) heavy cream
2 tablespoon Dijon mustard
1 tablespoon hot sauce
8 ounces roux (see above recipe)
16 ounces (1 pound) Extra sharp cheddar cheese- shredded through the big holes on the grater


Equipment
Spatula
Whisk Blender (preferably Vitamix)
Large Cast Iron Pot (if you have one)
Ladle
Large Mixing Bowl

• Heat a large cast iron pot (or whatever large pot you have) over medium heat for at least a minute and then add the olive oil. Let that heat for 30 seconds and then add the onions. Stir the onions until they start to turn translucent and then add the salt, pepper and garlic.

• Add the milk, cream, mustard and hot sauce. Heat until hot but not to a boil (yet).

• Whisk in the roux. The onions will get caught in your whisk. Yes it's a pain in the ass but just give the head of your whisk a shimmy shake right before it gets out of the sauce and everything will clear out.

• Continue to whisk until everything is incorporated.

• Bring the sauce to a boil. Whisk vigorously. Turn the heat down until the sauce is only simmering. Let the sauce simmer for 10 minutes.

• While whisking, add the cheese a little at a time. Whisk until the melted cheese is incorporated into the sauce. It will be slightly grainy. That's OK, we're about to a put a hurting on this sauce.

• Using a ladle, move half of the cheese sauce into the carafe of a blender. Blend the sauce on high for at least 30 seconds. Transfer blended sauce to a mixing bowl. Blend second half and pour into the mixing bowl. Mix both parts together. Rejoice in the cheese family's reunion

• Serve as you would like. I recommend it on a cheesesteak or on a hot dog. It seriously makes unbelievable Mac and Cheese.

• Wait until cool to pour into a container for the fridge or freezer. It's freezes amazingly well.


So there you have it. I made it sound way more complicated than it should be. Sorry.

Making Cheese Sauce will become your super power. Embrace it and use it recklessly.


If you want to contact us by email, please send your thoughts to here:

rouxdecookingschool@gmail.com


We're also here:

Twitter
https://twitter.com/RouxdePodcast

Facebook
https://www.facebook.com/groups/1205026479612382/

Instagram:
https://www.instagram.com/rouxdepodcast/


If you're looking for the gravy recipe that I mentioned on the podcast, you can find that right here:

http://rouxde.blogspot.com/2009/11/gravy-baby.html

Your mashed potatoes will thank you.


Thanks for listening and reading!


Cheers,
John


Friday, February 17, 2017